Image based Machine Learning Model
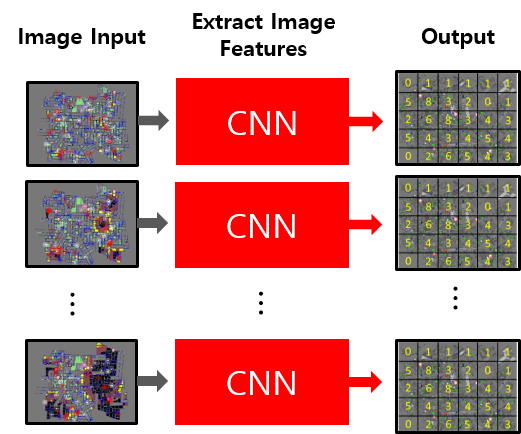
To predict the density of injured civilian in RCRS using image-based data, we train the machine learning model using simulation screenshot images. We consider that all frames of video clip in disaster situations are independent images. Therefore, we choose one frame randomly in images sequence of a disaster scenario in RCRS to train the machine learning model. The model’s inputs are simulated images created from RCRS. And CNN extracts images features, fully-connected layer output the number of injured people vectors in each grid cell.

And our program train the machine learning model as follows:
- Label the data created Scenario Generator
- Convert the data labeled in the first step to image data
- Train the machine learning model with data converted in the second step.
- Test the machine learning model with machine learning model trained in the third step.
1. Software Pre-Requisites
- TensorFlow 1.12.0
- Keras 2.2.4
2. Download project from GitHub and decompress RCRS
$ git clone https://github.com/swhaKo/RCRS_ML_Model.git
2. Configuration
In this repository, there is configuration file called config_image.txt. You can modify the number of civilians, the number of initial fire building and the number of data sets. Also you can modifiy the path where datasets are stored.
Constant of label the data
LIMIT_TIME_STEP: The start point of disaster scenario time step to save image dataset.
LIMIT_CIVILIAN_HP: The threshold of civilians’ HP point which determine civilian is injured or not
LABEL_TRAIN_START_MAP_NUM: The map data start number for training to label
LABEL_TRAIN_END_MAP_NUM: The map data end number for training to label
LABEL_TEST_START_MAP_NUM: The map data start number for testing to label
LABEL_TEST_END_MAP_NUM: The map data end number for testing to label
LABEL_DATASET_DIR: The path of scenario directory to label
Constant to convert the data
CONVERT_TRAIN_START_MAP_NUM: The map data start number for training to convert CONVERT_TRAIN_END_MAP_NUM: The map data end number for training to convert CONVERT_TEST_START_MAP_NUM: The map data start number for testing to convert CONVERT_TEST_END_MAP_NUM: The map data end number for testing to convert CONVERT_DATASET_DIR: The path of scenario directory to convert
Constant to train and test the ML model
MODEL_TRAIN_NAME: The name of ML model to train MODEL_TRAIN_START_MAP_NUM: The map data start number for training MODEL_TRAIN_END_MAP_NUM: The map data end number for training MODEL_TEST_NAME: The name of ML model to test MODEL_TEST_START_MAP_NUM: The map data start number for testing MODEL_TEST_END_MAP_NUM: The map data end number for testing MODEL_DATASET_DIR: The path of scenario directory to train and test MODELS_DIR: The path of machine learning model to save RESULTS_DIR: The path of result to save
3. Label the density of injured civilians to scenario
We use the machine learning model to predict the location of the injured. And predict the exact location of injured civilians requires considerable computational resources and complexity, so that we divide the simulation map into grid and predict the density of the injured people in each grid cell. This can significantly shorten computational resources, complexity and the time required for training. Furthermore, we expected that the accuracy of the prediction of the injured civilians location will also be increased.

And our program can automatically label the scenario follow this commands:
$ python3 Labeler_train.py [Map name] [Row of grid] [Column of grid]
$ python3 Labeler_test.py [Map name] [Row of grid] [Column of grid]
4. Convert the scenario to image
To train the machine learning model, we convert the scenario data which labeded in the step three. Our program automatically convert the scenario data to images using commands as below:
$ python3 Converter_train_image.py [Map name] [Row of grid] [Column of grid]
$ python3 Converter_test_image.py [Map Name] [Row of grid] [Column of grid]
5. Train the machine learning model to predict
Finally, you train the machine learning model. The speed of training the machine learning model is vary depending on the number of parameters of the model and your GPU. Before training the ML model, you must specify MODEL_TRAIN/TEST_NAME in the configuration file. The name of the ML model is a specified name depend on the type of CNN and attention module and we offer several specific names of the models. However, if you enter a non-specified model, you will get an error. The specified name of the model is shown in model_list.txt and the name of model should figure to CNN type of ML model_Attention Module. The Attention Module is the option you can add the module or not. The CNN type of ML model, we developed the ResNet, ResNeXt, InceptionV3, InceptionResNetV2, MobileNet, DenseNet and Xception CNN based machine learning model. And the attention module, we developed the Squeeze and excitation (SE), Convolutional Block Attention Module (CBAM) and Grid Convolutional Block Attention Module (GCBAM). If you want to see more detail about attention module, please refer this page. Therefore, you can set the name of ML model refer below list:
- CNN type of ML model
- ResNet_50
- ResNet_101
- ResNet_152
- ResNeXt_50
- ResNeXt_101
- Inception_v3
- InceptionResNet_v2
- MobileNet
- DenseNet_121
- DenseNet_169
- DenseNet_201
- DenseNet_264
- Xception
- Attention Module
- SE
- CBAM
- GCBAM
For example, if you want to create the machine learning model with InceptionResNetV2 CNN only to train, your MODEL_TRAIN_NAME of configuration file should InceptionResNet_v2. And if you want to create the machine learning model with InceptionResNetV2 CNN and CBAM attention module to train, your MODEL_TRAIN_NAME of configuration file should InceptionResNet_v2_CBAM. After input the model name, you can train your ML model using the command as below:
$ python3 Model_train_image.py [Map name] [Row of grid] [Column of grid]
$ python3 Model_train_image.py [Map Name] [Row of grid] [Column of grid]
Leave a comment